For this 7 Year run of GMC Trucks, they have quad headlights. Upgrading to Halogens will overload
the old wiring found in these trucks. The pathetic wiring in most old cars is not really good
enough for the power draw of newer light bulbs. The old switches will start to fail too. This
method replaces the bulb's power with heavy wiring & relays in the engine compartment.
The original wiring under the dash remains untouched.
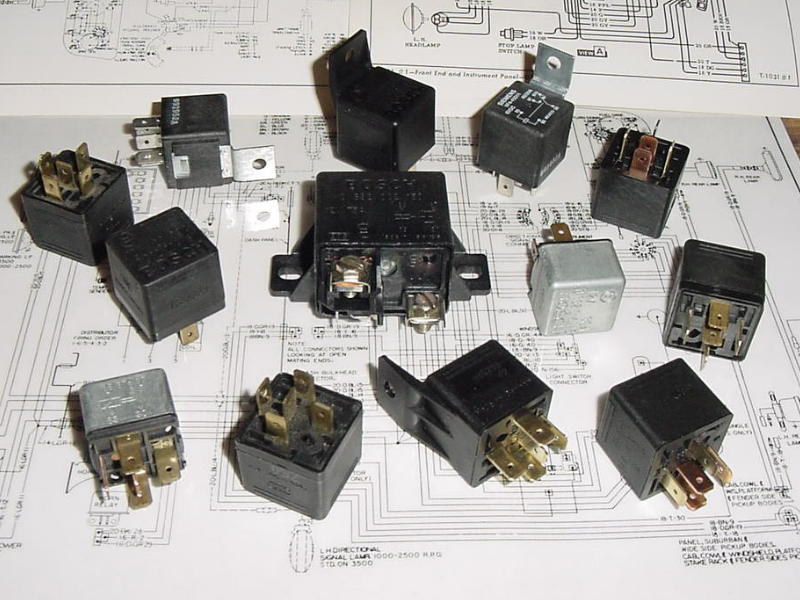
You will be needing two of these Bosch Relays for this Conversion.
Any Good parts house can get
them for you. My self I plan on using the Heavy Duty 75 amp version. The smaller 15-20 amp
relay will work good in most cases, and are easier to find.
Turn on the lights & use a test light to find out which color wire goes to which bulb terminal. You will
need to know which is high beam & which is low beam. The dash indicator determines this later. Write
them down somewhere for future reference. Keep track of which wire goes to what bulb terminal also.
Cut the wires going to the headlight bulbs & reroute them to each Bosch Relay's terminal #85. Ground
each relay's terminal #86. This makes the headlight & dimmer switches control the relay with a very
low current draw. The old headlight & dimmer switches will keep going as long as the mechanical
action lasts, because arcing & heating of the switch contacts disappear with this project.
Turn on the lights & operate the dimmer switch. You should hear clicking noises from the relays. Watch
the dash indicator & leave the lights on high beam. Use a test light to see which relay is on. Mark
this relay "High beam." (You should already know which relay is high beam if you wrote the wire colors
down first). Use 12 gauge wire for the "High Beam" circuit & 14 gauge wire for "Low Beam". Use
non-insulated terminals & heat shink tubing on all connections. Connect a 12 gauge wire to terminal #30
of each Bosch Relay. Route the 12 gauge wire to a point with battery power, you should use some kind of
juntion block & it should be powered by a 10 gauge wire from the battery "positive post". You may have
to purchase a battery terminal to enable the 10 gauge wire to attach to the battery itself. You also
might want to put a 40 amp curcit breaker close to the battery inline of the 10 gauge wire. An alternate
method is to tap onto the big wire going to the starter terminal. Don't power up the 10 gauge wire before
you get the relay end done, unless you like fireballs in your face should it touch the frame!
Run the gauge wire for each circuit from each relay's terminal #87 to the head lamp Connectors. The best way
is to remove the old wires from the bulb sockets by pushing in the tab "ear" from the side to get the
connector out. On some sockets, you will need a skinny tool pushed down along the terminal from the front
of the socket to push down the tab. Solder the high/low wires to the connectors. Replace the ground wires
with 12 gauge while you're at it. This avoids the crappy looking 1" splice at the bulb socket. Be sure of
which terminal is what before you tear them apart. You can solder the wires together at the bulb, & run the
set to the other light bulb. You will have to split the wiring somewhere to feed the two sides. Scope out
the vehicle for the best way to route them.
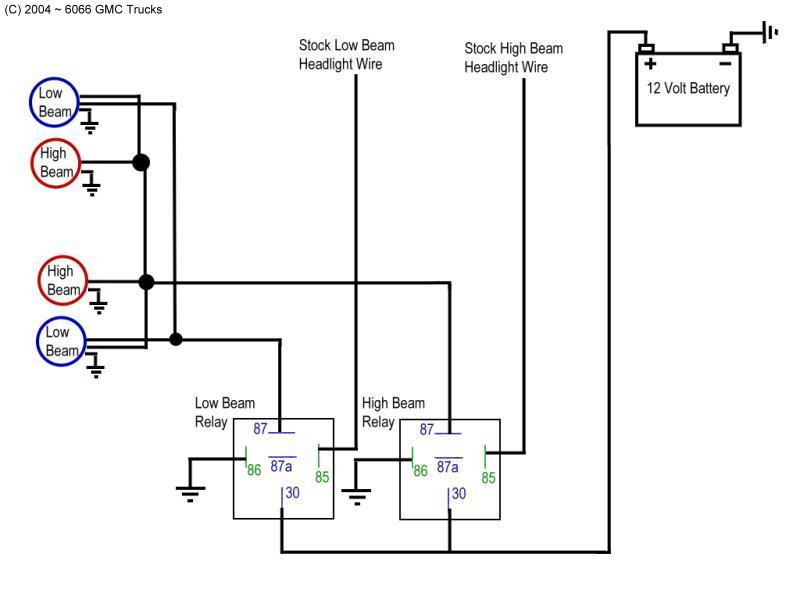
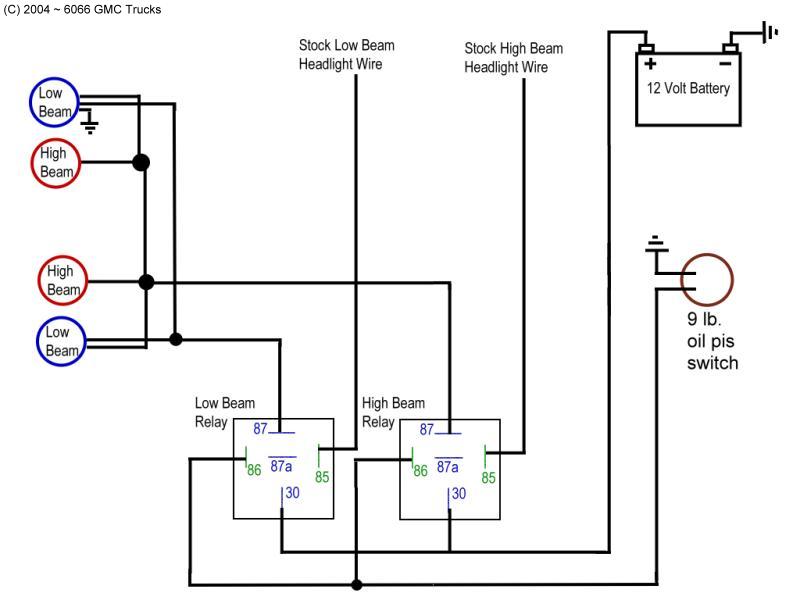
{Standard Diagram} {Oil Cut Out Diagram}
Diagrams by Jolly Goodfellow. Click to enlarge.
You can also add a few options to you head lighting system, like an Oil Cut Out switch. This is a 9 lb psi
oil pressure switch plumbed into an oil passage on the engine. It kills the power or ground to the relays
if the engine is not running or dies. You can use two type of switches here, the type that Grounds Out
to the Engine Block, or the Pass Through Type. The grounding out type of
switch would be connected
to the grounds on the headlight relays. This system would kill the ground to the lamp relays if oil pressure
drops below 9 lb psi, like is the engine dies. This will then shut off the headlamps saving your battery.
The Pass Through Type switch is wired in between the battery & the headlamp relays, killing the power
to the relay if the engine is not running. See the diagrams.
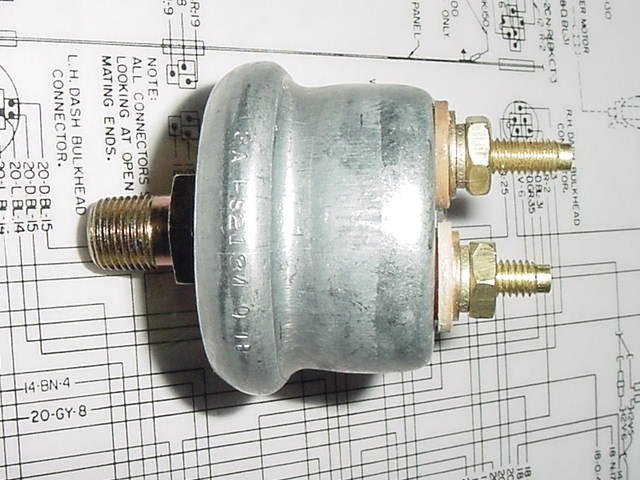

9 lb pis oil Pressure Switch, Pass Through Type
The ground wires should be ran up to the alternator bracket or other really solid grounding point. Don't
cut corners on grounding the light bulbs or you will end up with a "yellow light" problem! After you
are all done, you should have much brighter lights. The resistance of the new wiring is going to be a
lot less than it ever was from the factory. Enjoy!
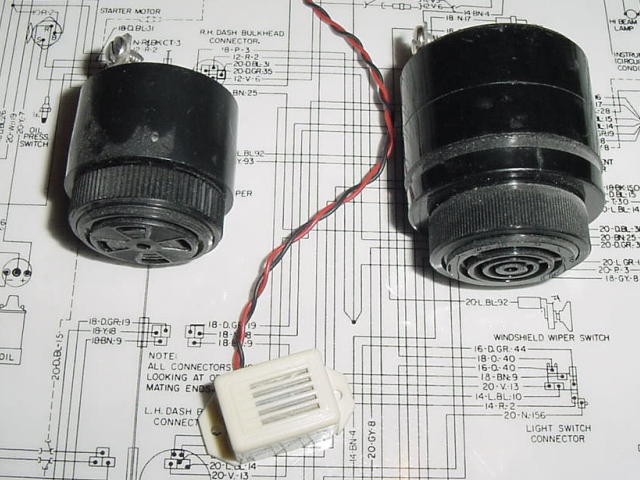
A Headlight Buzzer is a good ideal if you have a tendency to leave your headlights on. If you install
a buzzer or alarm, the best place in under the dash. you should wire the alarm to the head lighting
circuit, so that it will sound if you leave the headlights on & the truck is not running. You can
still use your park lights with out the motor running & get no buzz. Wire the buzzer in before
the dimmer switch so it will work with both high & low beams.
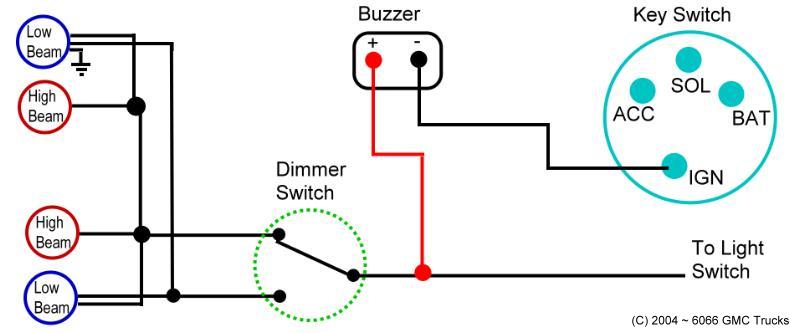
The alamrs & buzzer shown above are wired to the headlight switch with the red or positive side. The ground
side is wired to the key switch IGN post. These alarms have built in diodes, power only flows through them
one way, so when you have power on both wires, or just the ground wire, they do nothing. But kill power
to the ground with the lights on, they will sound off.
~ 6066 GMC Trucks ~ 6066 GMC Trucks ~ 6066 GMC Trucks ~ 6066 GMC Trucks ~ 6066 GMC Trucks ~ 6066 GMC Trucks ~ 6066 GMC Trucks ~ 6066 GMC Trucks ~
|
|
Lighting & Electrical Projects
|
|
|
|
|
|
~ 6066 GMC Trucks ~ 6066 GMC Trucks ~ 6066 GMC Trucks ~ 6066 GMC Trucks ~ 6066 GMC Trucks ~ 6066 GMC Trucks ~ 6066 GMC Trucks ~ 6066 GMC Trucks ~
© 2000-2008 6066 GMC Trucks. Last Updated December 10, 2008.